Interpolation Techniques

Interpolation is the process of using known data values to estimate unknown data values. Various interpolation techniques are often used in the atmospheric sciences. One of the simplest methods, linear interpolation, requires knowledge of two points and the constant rate of change between them. With this information, you may interpolate values anywhere between those two points. More sophisticated interpolations are also available in the Data Library. They are often applied to station datasets with irregular spacing between stations. The Cressman and Weaver analysis interpolation techniques are covered in this tutorial section. Both methods are primarily used to estimate equally-spaced latitude / longitude grid data from station data or gridded data with non-constant spacing.

Linear Interpolation

Linear interpolation is a simple technique used to estimate unknown values that lie between known values. The concept of linear interpolation relies on the assumption that the rate of change between the known values is constant and can be calculated from these values using a simple slope formula. Then, an unknown value between the two known points can be calculated using one of the points and the rate of change. Linear interpolation is a relatively straightforward method, but is often not sophisticated enough to effectively interpolate station data to an even grid. Linear interpolation is often used to regrid evenly-spaced data, such as longitude / latitude gridded data, to a higher or lower resolution.

Example: Regrid NOAA NCDC GCPS Monthly Gridded Precipitation Anomalies for Europe from a 5° x 5° resolution to a 1° x 1° resolution.
Locate Dataset and Variable
  • Select the "Datasets by Catagory" link in the blue banner on the Data Library page.
  • Click on the "Atmosphere" link.
  • Select the NOAA NCDC GCPS MONTHLY GRIDDED dataset.
  • Click on the "precipitation" link under the Datasets and Variables subheading.
  • Click on the "anomalies" link, again under the Datasets and Variables subheading. CHECK
Select Temporal and Spatial Domains
  • Click on the "Data Selection" link in the function bar.
  • Enter the text 13W to 32E, 35N to 60N, and Oct 1993 in the appropriate text boxes.
  • Press the Restrict Ranges button and then the Stop Selecting button. CHECK
View Gridded Data at a 5° x 5° Resolution
  • To see the results of this operation, choose the viewer window with coasts drawn. CHECK
October 1993 Precipitation Anomalies in Europe at 5°x 5° Resolution

The resolution of this dataset is relatively low, which makes the image appear fairly discontinuous. Linear interpolation can be used to help smooth the data by changing the grid to a higher resolution (e.g., 1° x 1°).
Perform Linear Interpolation
  • Click on the right-most link in the blue source bar to exit the viewer.
  • Click on the "Expert Mode" link in the function bar.
  • In the Expert Mode text box, enter the following lines below the text already there:
      X -13 1 32 GRID
      Y 35 1 60 GRID
    
  • Press the OK button. CHECK
    The two GRID commands regrid the data in the specified region to a different resolution. In this case, data located within 13° W to 32° E and 35° N to 60° N is regrided to a 1° x 1° resolution.
View Results at a 1° x 1° Resolution
  • To see the results of this operation, choose the viewer window with coasts drawn. CHECK
October 1993 Precipitation Anomalies in Europe at 1°x 1° Resolution

The data appears more continuous at a higher resolution. Above average precipitation amounts are found over the Alps in Northern Italy and Southern France and precipitation deficits are located over the Northern United Kingdom and Ireland. White-colored grid boxes represent regions of missing data.

Cressman Analysis

George Cressman developed the Cressman interpolation technique in 1959. The technique interpolates station data to a user-defined latitude-longitude grid. Multiple passes are made through the grid at consecutively smaller radii of influence to increase precision. The radius of influence is defined as the maximum radius from a grid point to a station by which the observed station value may be weighted to estimate the value at the grid point. Stations beyond the radius of influence have no bearing on a grid point value. At each pass, a new value is calculated for each grid point based on its correction factor. This correction factor is determined by analyzing each station within the radius of influence. For each such station, an error is defined as the difference between the station value and a value arrived by interpolation from the grid to that station. A distance-weighted formula (shown below) is then applied to all such errors within the radius of influence of the grid point to arrive at a correction value for that grid point. The correction factors are applied to all grid points before the next pass is made. Observations nearest the grid point carry the most weight. As the distance increases, the observations carry less weight. The cressman function in Ingrid calculates the weights as follows:

W = (R2 - r2)/(R2 + r2)

where R = influence radius and r = distance between the station and the gridpoint. The weighting function is pictured below.


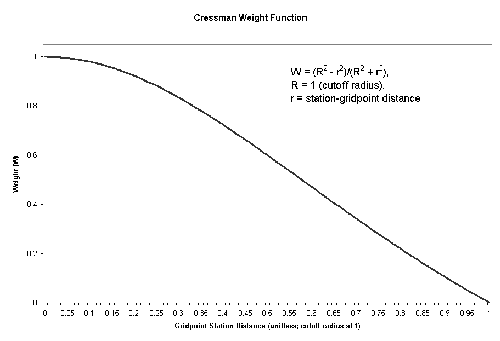
As the radius of influence is tightened, results become more representative of the observed data. The analysis value at each gridpoint is calculated as the analysis value from the previous pass added to the sum of the products of the calculated weights and the difference between the actual station value and the interpolated background value at the station, divided by the sum of the weights. The Data Library performs three passes by default, at 4, 2.5, and 1.5. These numbers are proportions of the average minimum station distance calculated in the function. These parameters may be changed when entering the command in Ingrid. There is also a minimum station number parameter, which ensures a certain number of station data points must be included within the radius of influence for an analysis value to be calculated for that gridpoint. If the minimum station number requirement is not met for a given gridpoint, a missing value will be assigned.

Cressman schemes may be used with data assimilation as well. Data assimilation is the analytical process of incorporating an estimation of the state of the atmosphere into a numerical model. By the early 1960s, weather centers within the United States began using data assimilation methods to improve forecasting techniques. They used interpolation techniques, such as the Cressman analysis, to interpolate current atmospheric conditions onto an evenly spaced grid. The Cressman analysis assigns weighted values of the observed stations to the model initialization, similar to the interpolation technique described above. However, Cressman suggests that persistence (climatology) values can be assigned if there are an insufficient number of stations in the area.

Advantages Disadvantages

Example: Perform a Cressman analysis of monthly surface temperature anomaly data over Australia for December 2000.

Locate Dataset and Variable
  • Select the "Datasets by Catagory" link in the blue banner on the Data Library page.
  • Click on the "Atmosphere" link.
  • Select the NOAA NCEP CPC CAMS dataset.
  • Click on the "station" link under the Datasets and Variables subheading.
  • Click on the "temperature" link again under the Datasets and Variables subheading. CHECK
Select Stations In Australia and Surrounding Islands
  • Click on the "searches" link to the right of the map.
  • In the lat text boxes under the Searches subheading, enter the values -40 and -10.
  • In the lon text boxes under the Searches subheading, enter the values 112 and 155.
  • Click the Search NOAA NCEP CPC CAMS station temperature button.
  • Click on the link immediately below the Searches subheading that says "Dataset (and map) with all data found in search." CHECK
    You have selected all of the stations within 40° S to 10° S and 112° E to 155° E. This region encompasses Australia and a few surrounding islands. For more information on finding station ID's, click the following link to the Data Library tutorial: How to Find A Station ID
Select Stations With 30-Year Climatology
  • Click on the "Expert Mode" link in the function bar if the text box is not already open.
  • Enter the following lines below the text already there:
    DataFlag
       1 1 masknotrange
       SELECT
    
  • Press the OK button. CHECK
    DataFlag is a variable in the CAMS station temperature dataset. Stations with 30 years of data since 1971 have a DataFlag equal to 1. The commands above mask out all stations with a DataFlag unequal to 1.
Compute Anomalies
  • In the Expert Mode text box, enter the following lines below the text already there:

          lon lat temp
          dup
          T (Jan 1971) (Dec 2000) RANGEEDGES
          yearly-climatology
          sub
          /long_name (Temperature Anomaly) def
    
  • Press the OK button. CHECK
    The lon, lat, and temp commands select those variables in the dataset. dup then duplicates the current dataset and adds it to the stack. The next command selects a temporal range for one of the identical variables. The following two commands compute the monthly climatology, and then subtract the climatology variable from the original data. The last command redefines the title of the resulting variable to "Temperature Anomaly".
Select Temporal Domain
  • In the Expert Mode text box, enter the following line below the text already there:
     T (Dec 2000) VALUE
    
  • Press the OK button. CHECK
    The command selects the month of December in the year 2000.
    *NOTE: You may not select ranges via the Data Selection link in the function bar. If you do, some commands entered earlier will be erased.
Perform Cressman Analysis
  • In the Expert Mode text box, enter the following lines below the text already there:

    [IWMO]cressman:
            3 minstns
           X 100 180 1 RANGEEDGESTEP
            Y -60 0 1 RANGEEDGESTEP
            4 pass1
            2.5 pass2
            1.5 pass3
            :cressman
    
  • Press the OK button. CHECK
    The proper syntax of the cressman function in Ingrid is shown above. The minstns parameter is set to 3. The data is analyzed over a spatial range from 100° E to 180° E, and 60° S to 0° N, at a resolution of 1°. The passes are at 4, 2.5, and 1.5 times the average minimum station distance calculated within the function.
View Results
  • To see the results of this operation, choose the viewer window with coasts drawn. CHECK
Australia Surface Temperature Anomaly for December 2000 at 1°x 1° Resolution

The default color scheme does not appear to be particularly ideal or intuitive. Changing the color scheme may greatly improve the visual representation of the data.
Generate Colormap
  • Click on the right-most link in the blue source bar to exit the viewer.
  • Again in the Expert Mode text box, enter the following lines below the text already there:

    startcolormap
         -10. 10. RANGE
         white black purple
            -10. VALUE
            cyan
             -1. VALUE
             white white
               1. bandmax
               yellow
                1. VALUE
                red
                 10. VALUE
                 firebrick endcolormap
    
  • Press the OK button. CHECK
    The colorscale is depicted at the bottom of the dataset page. Values less than -10° are assigned the color black and values greater than 10° are assigned the color firebrick. Values between -1° and 1° are white. Missing values are also white. For more information on colorscales, see the Data Library Tutorial.
View Results with New Color Scheme
  • To see the results of this operation, choose the viewer window with coasts drawn. CHECK
Australia Surface Temperature Anomaly for December 2000 at 1°x 1° Resolution

Northern Australia experienced below average temperatures while Southern Australia generally experienced above average temperatures for December 2000. The more extreme anomalies appear to line up along a constant meridian near 138° E.

Weaver Analysis

The Weaver analysis is another type of interpolation scheme, developed at the Climate Prediction Center in the 1970's. In the Data Library, a simplified weaver function can be used to perform unweighted interpolation, examples of which are shown below. Weaver analysis is different from the Cressman analysis in many ways. First, the Weaver analysis does not use radii of influence. When the weaver function is used to interpolate to an equally spaced longitude/latitude grid, only the observations located within each grid box are used to calculate the interpolated value for that grid box. Any observations located outside the grid box, regardless of their proximity to the boundary of the grid box, will not affect the interpolated value of the grid box. Second, the weaver function does not weight the values of the observations. The value of each grid box is found by computing a simple arithmetic average of the observations.

Advantages Disadvantages
Example: Perform a Weaver analysis of monthly surface temperature anomaly data over Austrailia for December 2000.
Locate Dataset and Variable *NOTE: This example uses the same dataset and variable as the previous example.
  • Select the "Datasets by Catagory" link in the blue banner on the Data Library page.
  • Click on the "Atmosphere" link.
  • Select the NOAA NCEP CPC CAMS dataset.
  • Click on the "station" link under the Datasets and Variables subheading.
  • Click on the "temperature" link again under the Datasets and Variables subheading. CHECK
Select Stations In Australia and Surrounding Islands
  • Click on the "searches" link to the right of the map.
  • In the lat text boxes under the Searches subheading, enter the values -40 and -10.
  • In the lon text boxes under the Searches subheading, enter the values 112 and 155.
  • Click the Search NOAA NCEP CPC CAMS station temperature button.
  • Click on the link immediately below the Searches subheading that says "Dataset (and map) with all data found in search." CHECK
    You have selected all of the stations within 40° S to 10° S and 112° E to 155° E. This region encompasses Australia and a few surrounding islands. To get general information on finding station ID's, click the following link to the tutorial: How to Find A Station ID
Select Stations With 30-Year Climatology
  • Click on the "Expert Mode" link in the function bar if the text box is not already open.
  • Enter the following lines below the text already there:

    DataFlag
       1 1 masknotrange
       SELECT
    
  • Press the OK button. CHECK
    DataFlag is a variable in the CAMS station temperature dataset. Stations with 30 years of data since 1971 have a DataFlag equal to 1. The commands above mask out all stations with a DataFlag unequal to 1.
Compute Anomalies
  • In the Expert Mode text box, enter the following lines below the text already there:

          lon lat temp
          dup
          T (Jan 1971) (Dec 2000) RANGEEDGES
          yearly-climatology
          sub
          /long_name (Temperature Anomaly) def
    
  • Press the OK button. CHECK
    The temp command selects the "temp" variable in the dataset. dup then duplicates the variable and adds it to the stack. The next command selects a temporal range for one of the identical temp variables. The following two commands compute the monthly climatology of that variable, and then subtract the climatology variable from the original data. The last command redefines the title of the resulting dataset to "Temperature Anomaly".
Select Temporal Domain
  • In the Expert Mode text box, enter the following line below the text already there:

     T (Dec 2000) VALUE
    
  • Press the OK button. CHECK
    The command selects the month of December in the year 2000.
    *NOTE: You may not select ranges via the Data Selection link in the function bar. If you do, some commands entered earlier will be erased.
Perform Weaver Analysis
  • In the Expert Mode text box, enter the following lines below the text already there:

     [IWMO]weaver:
            X 100 180 1 RANGEEDGESTEP
            Y -60 0 1 RANGEEDGESTEP
            false setweave
            :weaver
    
  • Press the OK button. CHECK
    The proper syntax of the weaver function in Ingrid is shown above. The data is analyzed over a spatial range from 100° E to 180° E, and 60° S to 0° N, at a resolution of 1°, similar to the previous example. This spatial range is larger than the range in which the selected stations are located. The "false setweave" command tells the function to perform an interpolation by averaging the stations in each grid box.
Generate Colormap
  • Again in the Expert Mode text box, enter the following lines below the text already there:

    startcolormap
         -10. 10. RANGE
         grey black purple
            -10. VALUE
            cyan
             -1. VALUE
             white white
               1. bandmax
               yellow
                1. VALUE
                red
                 10. VALUE
                 firebrick endcolormap
    
  • Press the OK button. CHECK
    The colorscale is depicted at the bottom of the dataset page. Values less than -10° are assigned the color black and values greater than 10° are assigned the color firebrick. Values between -1° and 1° are white. Missing values are grey. For more information on colorscales, see the Tutorial.
View Results
  • To see the results of this operation, choose the viewer window with coasts drawn. CHECK
Australia Surface Temperature Anomaly for December 2000 at 1° x 1° Resolution

The effect of choosing such a high resolution (1° x 1°) is that most of the grid boxes contain missing values. Yet, it is still possible to make out the below average temperatures in Northern Australia and the above average temperatures in Southern Australia. However, the primary purpose of interpolation is to estimate values where there are no observations. We should therefore try using a lower resolution.
Perform Weaver Analysis at a 5° Resolution
  • Click on the right-most link in the blue source bar to exit the viewer.
  • In the Expert Mode text box, change the following text:
  • Change the number 1 in the X 100 180 1 RANGEEDGESTEP command to the number 5.
  • Chage the number 1 in the Y -60 0 1 RANGEEDGESTEP command to the number 5. CHECK These changes will adjust the resolution of the spatial grid from 1° x 1° to 5° x 5°. As a result, more grid boxes will contain observations. Missing values should occupy less area in the spatial grid.
View Results
  • To see the results of this operation, choose the viewer window with coasts drawn. CHECK
Australia Surface Temperature Anomaly for December 2000 at 5° x 5° Resolution

At a lower resolution, there are fewer grid boxes with missing data. However, the accuracy of the interpolated values generally declines as the resolution increases. Observations are averaged over large distances, reducing variability within each grid box.
Example: Perform a Weaver interpolation of the Normalized Difference Vegetative Index (NDVI) in South America to an even longitude / latitude grid at a 0.2° resolution.

Locate Dataset and Variable
  • Select the "Datasets by Catagory" link in the blue banner on the Data Library page.
  • Click on the "Topographic and Land Characteristics" link.
  • Select the NASA GES-DAAC PAL vegetation dataset.
  • Select the "south america" link under the Datasets and Variables subheading. CHECK
Select Domains
  • No ranges will be adjusted in this example. The dataset will be analyzed over its entire temporal and spatial grids.
Perform Weaver Interpolation
  • Click on the "Expert Mode" link in the function bar.
  • Enter the following lines under the text already there:
    lon lat NDVI[x y]weaver:
            X -84 -32 0.2 RANGEEDGESTEP
            Y -58 14 0.2 RANGEEDGESTEP
            false setweave
            :weaver
    
  • Press the OK button. CHECK
    The weaver function regrids the NDVI data variable from the default Interrupted Goode Homolosine projection to an even longitude / latitude grid. The lon/lat range is 84° W to 32° W and 58° S to 14° N at a 0.2° resolution. Notice the original NDVI projection is dependent on two grids, x and y, which should not be confused with longitude and latitude grids. The weaver function averages the NDVI values that fall inside each longitude / latitide grid box to compute an interpolated value for that box.
View Results
  • To see the results of this operation, choose the viewer with coasts drawn. CHECK
  • You may adjust the time period represented by the image by editing the range in the text box above the viewer.
South America Regrided NDVI Data for July 13-20, 1981 at a 0.2° x 0.2° Resolution

The most common measurement of plant growth density is the Normalized Difference Vegetation Index (NDVI). The NDVI, like most other vegetative indices, is calculated as a ratio between measured reflectivity in the red and near infrared sections of the electromagnetic spectrum. These spectral bands are chosen because they are most affected by the absorption of chlorophyll in leafy green vegetation.Very low values of NDVI (0.1 and below) correspond to barren areas of rock, sand, or snow. Moderate values represent shrub and grassland (0.2 to 0.3), while high values indicate temperate and tropical rainforests (0.6 to 0.8). The weaver function regrids the NDVI data to an equal latitude / longitude grid. It appears from the image that in July of 1981, dense vegetation would be found within the Amazon River Basin, while less dense areas would be found to the south and east. If you change the time period above the image to a more recent date, you will observe that a similar vegetative pattern in South America still exists today.